
Downloads
FREQUENTLY ASKED QUESTIONS
Cleaning/Maintenance
How to disassemble the Cooling Unit and clean the VENTY?
1. Pull the Mouthpiece out of the Cooling Unit Cap while slightly tilting it back and forth. Pull off the Mouthpiece Seal Ring using the recess.
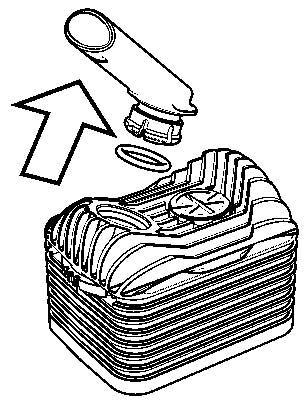
2. Put the edge of the Mouthpiece into the notch of the Rotary Cap and turn it counterclockwise to open and pull out. Pull off the Seal Ring from the Rotary Cap using the recess.
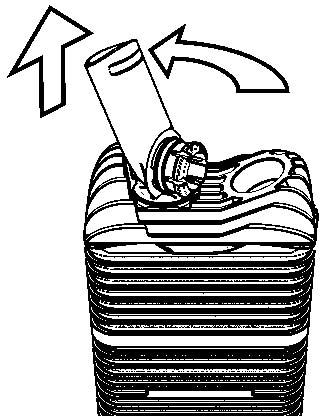
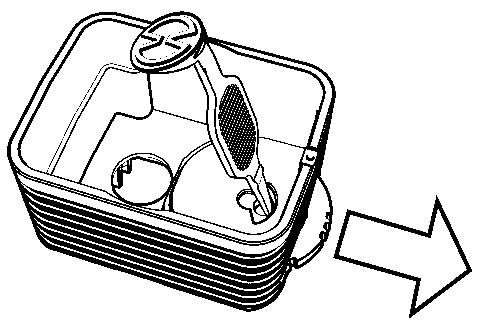
3. Pull the Cooling Unit Cap off the Vaporizer.
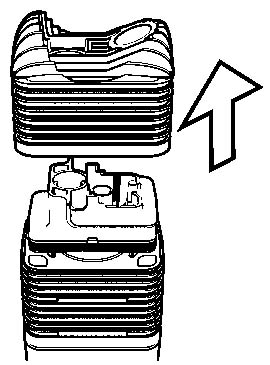
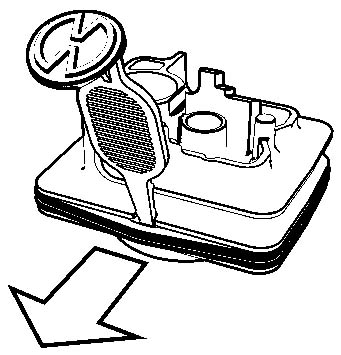
4. Pull out the Screen inside the Cooling Unit.
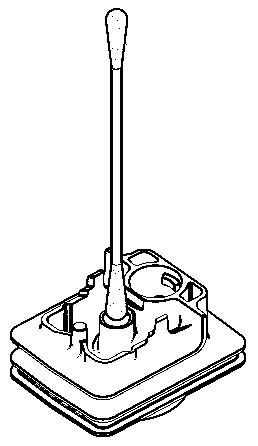
5. Use the Filling Chamber Tool to press the Setting Wheel out of the Cooling Unit.
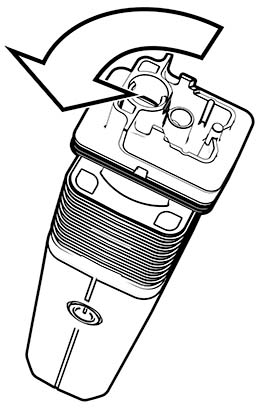
6. Unscrew the Cooling Unit Base from the Vaporizer by turning it 90° counterclockwise.
7. Lever out the large Base Seal Ring with Filling Chamber Tool at the recess in the groove.
8. Carefully press out the Screen from above using a cotton swab.
9. Place all parts of the Cooling Unit in warm rinsing water. Alternative: Soak all parts of the Cooling Unit in isopropyl alcohol for a maximum of 1/2 hour. Rinse all parts under running water for at least one minute. Let all parts dry completely.
 More
MoreHow to remove/replace the Filling Chamber Screen?
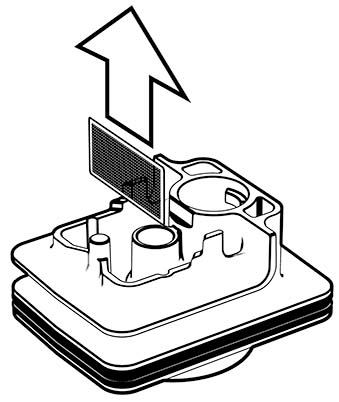
Using pointy tweezers, start levering the Screen out of the rim from the side of the Filling Chamber.
Then pinch the Screen with the tweezers and remove it from the Filling Chamber. Please, proceed with caution.
Make sure to re-insert the Screen in correct orientation, with its bent edges facing down.
After re-inserting the Screen, carefully press it down using the Filling Chamber Tool.
If the screen is damaged in the process, please replace it with a new one.
More
Function
How to charge the VENTY?
Fully charge the battery before the first use.
Connect the Vaporizer to a USB-C charger using the USB-C cable supplied.
- Vaporizer vibrates and display lights up.
- Charge status fields flash in an ascending order to indicate charging level.
- As soon as the battery is fully charged, all six charge status fields are visible.
In order to maximize battery life you can activate ECO charging mode through the Web App.
Indication on the display during charging:

Charging with a USB-charger
Charge status fields: Flash in an ascending order to indicate charging levelQuick charge (if supported by the charger)
Charge status fields: Quickly flash in an ascending order to indicate charging levelCharging with a low power charger
Charge status fields: Slowly flash in an ascending order to indicate charging levelAdditional Display indication:
 (use a more powerful charger).More
How to adjust the airflow of the VENTY?
The VENTY has an adjustable airflow, which can be adjusted with the help of the Setting Wheel.
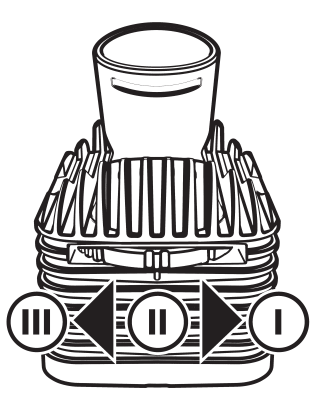
Low airflow: Turn the Setting Wheel to one notch. The air outlet is almost closed.
Medium airflow: Turn the Setting Wheel to two notches. The air outlet is half open.
High airflow: Turn the Setting Wheel to three notches. The air outlet is completely open.
MoreHow can I change the VENTY from Celsius to Fahrenheit and vice versa?
Press the plus and minus buttons simultaneously.
MoreHow to adjust temperature settings of the VENTY
The VENTY offers three factory preset temperature levels.
Video: VENTY – How to adjust temperatures (by STORZ & BICKEL) - YouTube
Base Temperature (180°C/356°F as default)
Activate: Is automatically active when device is turned on by pressing the Power Button.
Indication:
- Display shows set temperature.
- Orange display light during heat up.
- Green light and double vibration when temperature is reached.
Press the + or – button briefly: Changes temperature in 1° steps between 40°C and 210°C (104°F and 410°F)
Press and hold the + or – button: Changes temperature by continuously and fast running numbers until button is released.
Booster Temperature (+15°C/27°F)Activate: By double pressing the Power Button. Deactivates after 90s and goes back to your set Base Temperature.
Indication:
- Display shows Booster Temperature.
- °C/F° symbol flashes during heat up.
- Green display light and double vibration when temperature is reached.
Press the + or – button briefly:
- Changes temperature in 1° steps.
- Temperature offset can be adjusted through the Web App.
Press and hold the + or – button: Changes temperature by continuously and fast running numbers until button is released.
Superbooster Temperature (+15°C/27°F)Activate: By double pressing the Power Button when starting point is the Booster Temperature. Deactivates after 90s and goes back to your set Base Temperature.
Indication:
- Display shows Superbooster Temperature.
- °C/°F symbol flashes quickly during heat up.
- Green display light and double vibration when temperature is reached.
Press the + or – button briefly: Changes temperature in 1° steps. Superbooster Temperature offset can be adjusted through the Web App.
Press and hold the + or – button: Changes temperature by continuously and fast running numbers until button is released.
By double pressing the Power Button in Superbooster Temperature you get back to Base Temperature.
Booster Timeout & Permanent Boost:
The Booster and Superbooster Temperatures are automatically deactivated after 90 seconds and the VENTY jumps back to the set base temperature. Activate the Permanent Boost in the S&B Web App to deactivate the 90-second Timeout.The preset Booster and Superbooster Temperatures as well as the 90-second Booster Timeout can be individually adjusted via STORZ & BICKEL Web App.
MoreCan the VENTY be used with Dosing Capsules?
Yes, the VENTY can be used with Dosing Capsules.
Notice: The Dosing Capsules can impere the airflow.
Fill the Dosing Capsules, available as optional accessories, with crushed plant material and insert them into the Filling Chamber with the cap facing upwards.
MoreHow can I reset the settings of the VENTY?
There are two ways to reset the VENTY:
Press the Power Button for 10 seconds.
OR: Reset through the Web App
A vibration and a reset animation indicate the reset.
The Basis and Booster Temperature are reset to factory settings.More
App
Do I necessarily need to use the STORZ & BICKEL Web App to operate the VENTY?
No!
The STORZ & BICKEL Web App is not necessary for operation of the VENTY but allows individual settings and the reading of additional information during operation with the device.
MoreHow to access and use the S&B Web App
Switch on the smartphone and ensure that the Bluetooth function is switched on and that it is not blocked by another Bluetooth device.
Switch on the VENTY and open a browser which supports Bluetooth connectivity.
Go to app.storz-bickel.com
Follow the instructions how to connect the device with the Web App
MoreHow can I change the superbooster and booster temperature of the VENTY in the Web App?
Switch on the smartphone and ensure that the Bluetooth function is switched on and that it is not blocked by another Bluetooth device.
Switch on the VENTY and open a browser which supports Bluetooth connectivity.
Go to app.storz-bickel.com
Follow the instructions how to connect the device with the Web App
More